안드로이드 View Binding 사용하기 - kotlin-android-extensions 지원 중단

Lucy / Facilitate4U
2021. 3. 12. 13:27
반응형
안드로이드 View Binding 방법 정리
안드로이드 코드에서 레이아웃 View에 접근하기 위해 사용된
kotlin-android-extensions 의 지원이 중단예정으로, 이를 대체하여 사용 할 수 있는 ViewBinding 사용법에 대해 정리
합니다.
kotlin-android-extensions 와 ViewBinding 차이
- kotlin-android-extensions : View의 Id로 코드에서 직접 접근
- 코드에서 사용될 모든 View의 id가 고유한 값을 가져야함
- 따라서, 코드가 지저분해 질 수 있음
- 중복된 id를 사용하는 뷰 참조시 실수가 발생할 수 있음
- ViewBinding : XML 레이아웃 파일의 결합 클래스를 사용
- 유효하지 않은 뷰 ID로 인한 null 포인터 예외가 발생할 위험이 없음
- XML 레이아웃 전체를 클래스화 하기 때문에, 레이아웃과 코드의 비호환성 문제가 없음
View Binding 사용 조건
이 포스트에서 소개하는 View Binding 방식은 Android Studio 3.6 이상에서 사용 할 수 있습니다.
View Binding 설정
viewBinding 사용 설정
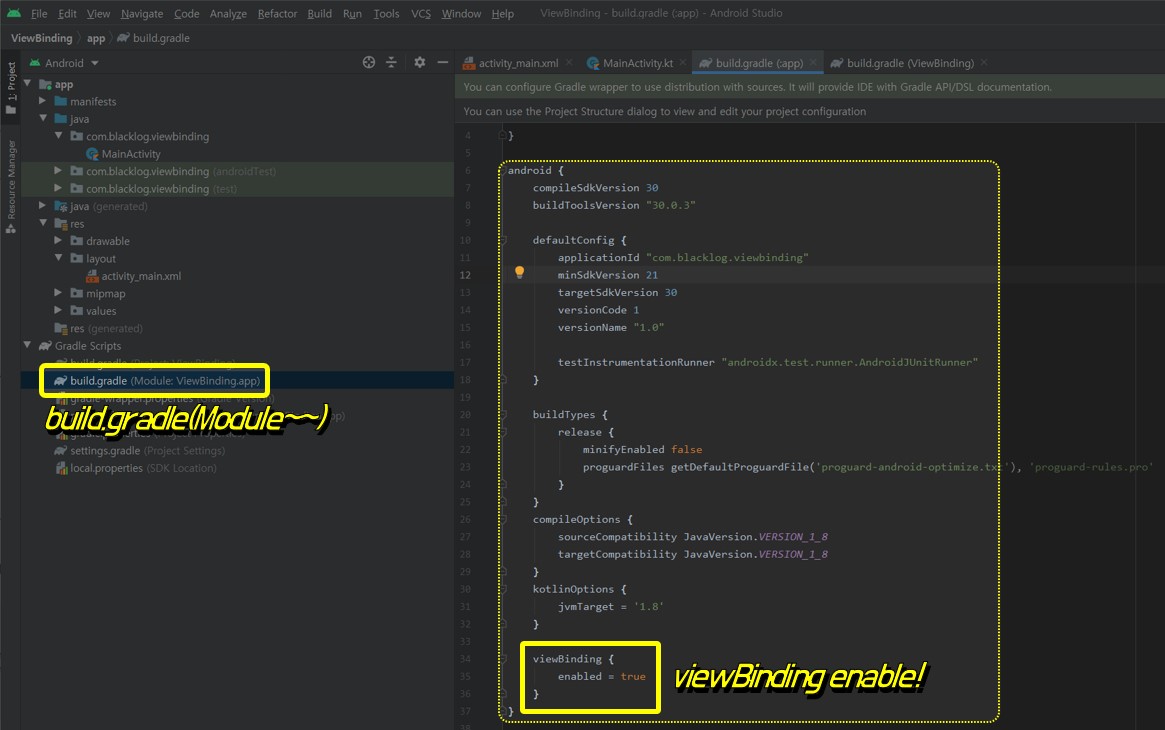
build.gradle(Module) 파일에 viewBinding 요소를 추가합니다.
android {
  ...
  viewBinding {
	  enabled = true
  }
}
실제 build.gradle(Module) 파일에서 아래와 같이 코드를 추가하면 됩니다.

코드를 추가 후 반드시 상단 알림바의 Sync Now를 선택해야 합니다.
사용 예시
안드로이드 layout 파일명은 단어사이를 언더바로 구분하는 Snake Case 명명규칙으로 정해집니다. viewBinding을 사용하면 xml의 파일명을 Camel Case 명명규칙으로 변환 + Binding 된 이름의 결합 클래스가 생성 됩니다. 레이아웃 내의 id를 가지고 있는 뷰는 결합 클래스의 프로퍼티명으로 사용됩니다.
Activity에서 ViewBinding 사용하기
activity_main.xml 코드
아래는 activity_main.xml 코드의 예시입니다.
<?xml version="1.0" encoding="utf-8"?>
<androidx.constraintlayout.widget.ConstraintLayout xmlns:android="http://schemas.android.com/apk/res/android"
    xmlns:app="http://schemas.android.com/apk/res-auto"
    xmlns:tools="http://schemas.android.com/tools"
    android:layout_width="match_parent"
    android:layout_height="match_parent"
    tools:context=".MainActivity">

    <TextView
        android:id="@+id/textView"
        android:layout_width="wrap_content"
        android:layout_height="wrap_content"
        android:text="Hello World!"
        android:textSize="20dp"
        app:layout_constraintBottom_toTopOf="@+id/button"
        app:layout_constraintEnd_toEndOf="parent"
        app:layout_constraintStart_toStartOf="parent"
        app:layout_constraintTop_toTopOf="parent" />

    <Button
        android:id="@+id/button"
        android:layout_width="wrap_content"
        android:layout_height="wrap_content"
        android:text="button"
        app:layout_constraintBottom_toBottomOf="parent"
        app:layout_constraintEnd_toEndOf="parent"
        app:layout_constraintStart_toStartOf="parent"
        app:layout_constraintTop_toBottomOf="@+id/textView" />

</androidx.constraintlayout.widget.ConstraintLayout>
ActivityMain.kt 코드
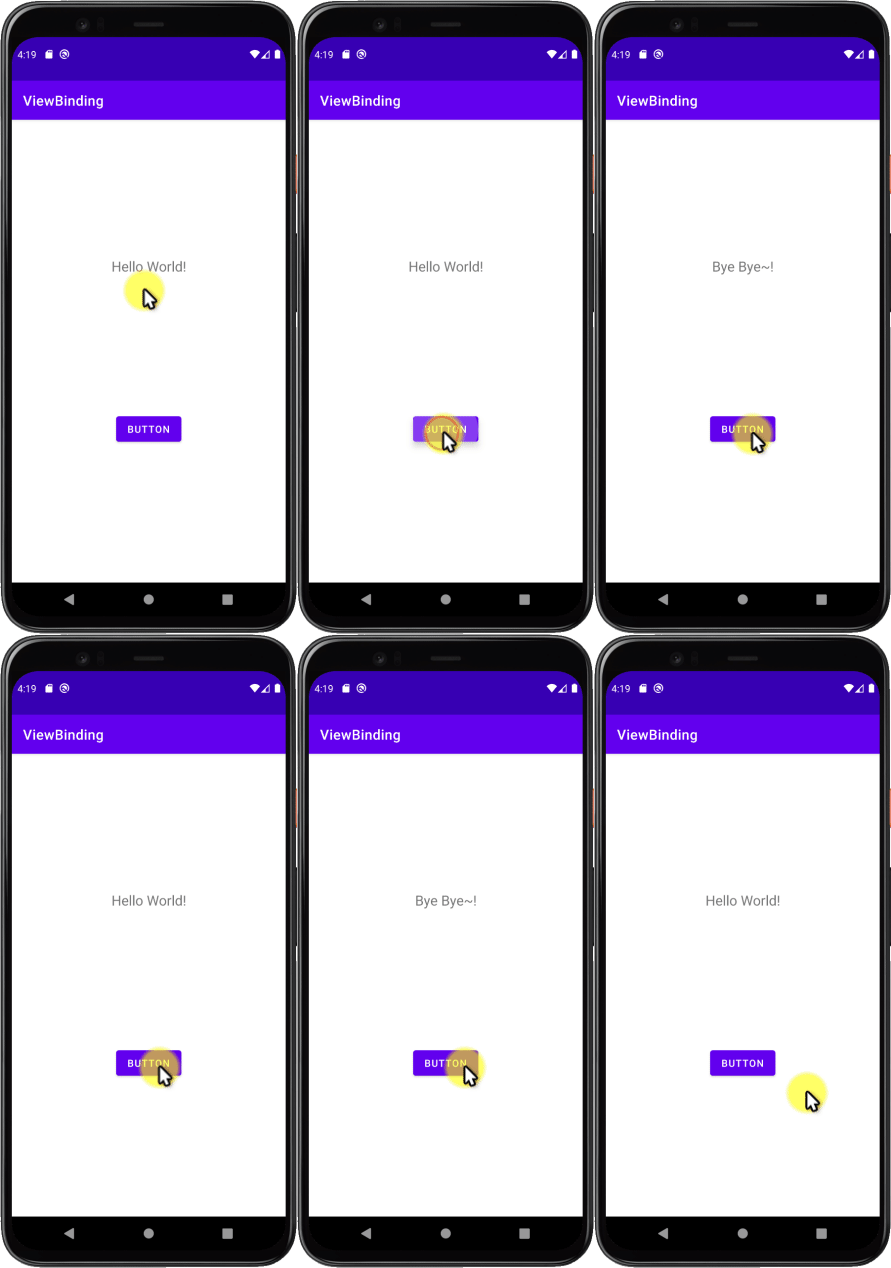
아래 코드는 버튼을 누르면 textView의 텍스트가 "Hello World!" 와 "Bye Bye~!" 메세지를 번갈아 가며 표시합니다.
package com.blacklog.viewbinding

import androidx.appcompat.app.AppCompatActivity
import android.os.Bundle
import com.blacklog.viewbinding.databinding.ActivityMainBinding

class MainActivity : AppCompatActivity() {

    private lateinit var binding: ActivityMainBinding
    var toggle: Boolean = true

    override fun onCreate(savedInstanceState: Bundle?) {
        super.onCreate(savedInstanceState)
        binding = ActivityMainBinding.inflate(layoutInflater)
        val view = binding.root
        setContentView(view)

        binding.button.setOnClickListener {
            if(toggle) binding.textView.text = "Bye Bye~!"
            else binding.textView.text = "Hello World!"
            toggle = !toggle
        }
    }
}
실행 화면
아래 그림은 위의 코드를 실행한 화면입니다.

Flagment에서 ViewBinding 사용하기
fragment_test.xml 코드
아래는 fragment_test.xml 코드의 예시입니다.
<?xml version="1.0" encoding="utf-8"?>
<androidx.constraintlayout.widget.ConstraintLayout xmlns:android="http://schemas.android.com/apk/res/android"
    xmlns:app="http://schemas.android.com/apk/res-auto"
    xmlns:tools="http://schemas.android.com/tools"
    android:layout_width="match_parent"
    android:layout_height="match_parent"
    tools:context=".TestFragment">

    <!-- TODO: Update blank fragment layout -->

    <TextView
        android:id="@+id/textView"
        android:layout_width="wrap_content"
        android:layout_height="wrap_content"
        android:text="Hello World!"
        android:textSize="20dp"
        app:layout_constraintBottom_toTopOf="@+id/button"
        app:layout_constraintEnd_toEndOf="parent"
        app:layout_constraintStart_toStartOf="parent"
        app:layout_constraintTop_toTopOf="parent" />

    <Button
        android:id="@+id/button"
        android:layout_width="wrap_content"
        android:layout_height="wrap_content"
        android:text="button"
        app:layout_constraintBottom_toBottomOf="parent"
        app:layout_constraintEnd_toEndOf="parent"
        app:layout_constraintStart_toStartOf="parent"
        app:layout_constraintTop_toBottomOf="@+id/textView" />

</androidx.constraintlayout.widget.ConstraintLayout>
fragment.kt 코드
아래 코드는 버튼을 누르면 textView의 텍스트가 "Hello World!" 와 "Bye Bye~!" 메세지를 번갈아 가며 표시합니다.
package com.blacklog.viewbinding

import android.os.Bundle
import androidx.fragment.app.Fragment
import android.view.LayoutInflater
import android.view.View
import android.view.ViewGroup
import com.blacklog.viewbinding.databinding.FragmentTestBinding

/**
 * A simple [Fragment] subclass.
 * Use the [TestFragment.newInstance] factory method to
 * create an instance of this fragment.
 */
class TestFragment : Fragment() {

    private var _binding: FragmentTestBinding? = null
    private val binding get() = _binding!!
    var toggle: Boolean = true

    override fun onCreateView(
        inflater: LayoutInflater, container: ViewGroup?,
        savedInstanceState: Bundle?
    ): View? {
        _binding = FragmentTestBinding.inflate(inflater, container, false)
        val view = binding.root
        return view
    }

    override fun onViewCreated(view: View, savedInstanceState: Bundle?) {
        super.onViewCreated(view, savedInstanceState)

        binding.button.setOnClickListener {
            if(toggle) binding.textView.text = "Bye Bye~!"
            else binding.textView.text = "Hello World!"
            toggle = !toggle
        }
    }

    override fun onDestroyView() {
        super.onDestroyView()
        _binding = null
    }
}
실행 결과
위 코드를 실행하면 아래 그림과 같이 Activity 사용한 결과와 동일합니다.

'Programming > Android App(Kotlin)' 카테고리의 다른 글
| 안드로이드 코틀린 : 런타임 권한(위험 권한) 요청 코드 작성 방법 - 카메라 및 외부 저장소 권한 사용 예시 (1) | 2021.03.16 |
|---|---|
| 안드로이드 코틀린 : 권한 개요 및 일반 권한 사용하기 - WebView (0) | 2021.03.15 |
| 안드로이드 코틀린 : 전환된 Activity 종료 결과 수신하기, startActivityForResult() 와 onActivityResult() (1) | 2021.03.11 |
| 안드로이드 코틀린 : Activity 전환 할 때 데이터 넘기기 (0) | 2021.03.10 |
| 안드로이드 코틀린 : Intent를 사용하여 Activity 화면 전환 (1) | 2021.03.09 |
