
Android Kotlin : CameraX 카메라 앱 만들기 - Timer 적용하기
CameraX 를 사용한 카메라 앱에 타이머 모드를 추가
하는 예제입니다. 이전 CameraX 관련 포스트의 코드에서 기능을 추가하는 것으로 기본적인 코드는 이전의 포스트들을 참고해주세요. 하단의 CameraX 관련 포스트를 클릭하면 CameraX 관련 포스트만 볼 수 있습니다.CameraX 카메라 앱 : 사진 찍기, 줌, 플래쉬 기능 추가
안드로이드 코틀린 : CameraX 카메라 앱 - Zoom In/Out 배율 확대 축소 조정하기
Android Kotlin : CameraX 카메라 앱 만들기 - 카메라 줌 배율 조절하기 지난 포스트에서는 CameraX 라이브러리로 제작한 기본 카메라 앱에 플래쉬를 ON/OFF 하는 방법에 대해 작성하였습니다. 이번 포스트
juahnpop.tistory.com
Timer 추가 방법
카메라 앱에 Timer를 추가하는 방법은 여러가지가 있겠지만, 이 포스트에서는 지난 포스트에서 설명한 Thread를 적용하였습니다. 시간 측정을 수행하는 새로운 Thread를 생성 후 시간 측정이 완료되면 Handler에 메세지를 보내고, Handler에서 사진을 찍는 메서드를 호출 할 예정입니다. Thread와 Handler에 대한 개념이 없으면 아래의 포스트를 참고해주세요.
안드로이드 코틀린 : 쉬운 말로 설명하는 Thread 와 Handler 개념 이해 및 타바타 타이머 예시
Android Kotlin : 내마음대로 설명하는 Thread, Handler 와 예시 저는 새로운 것을 학습해야 할 때, 처음부터 익숙하지 않은 단어와 도표들을 보면 진입 장벽이 느껴져 어렵지 않은 것들도, 어렵게만 느껴
juahnpop.tistory.com
전역 변수 선언
Timer On/OFF 상태를 저장하는 timerFlag 변수와 TimerCount를 저장하는 변수를 클래스 내의 전역 변수로 선언합니다.
// Timer
private var timerFlag = 0
private var timerCount = 0
타이머 On/Off 버튼 이벤트
타이머 On/Off 버튼을 클릭하는 경우 timerFlag를 설정합니다. 버튼은 토글 방식으로 사용하였고, timerFlag 에 반전된 값을 입력하고, 버튼의 텍스트를 변경합니다.
// Timer On,OFF Toggle Button Click Event
binding.btnTimerOnOFF.setOnClickListener {
    when(timerFlag){
        0 -> {
            binding.btnTimerOnOFF.text = "Timer ON"
            timerFlag = 1
        }
        1 -> {
            binding.btnTimerOnOFF.text = "Timer OFF"
            timerFlag = 0
        }
    }
}
사진 촬영 버튼 이벤트
사진 촬영 버튼을 눌렀을 때 timeFlag의 값이 1인 경우 타이머를 실행합니다. 이 예시에서 timerCount는 3초로 임의로 지정하였습니다. 1초 간격으로 Handler에게 알람을 줍니다.
// TakePicture Button Click Event
binding.btnTakePicture.setOnClickListener {
    when(timerFlag){
        0 -> takePhoto()
        1 -> {
            timerCount = 3
            thread(start = true){
                while(timerCount >= 0){
                    handler.sendEmptyMessage(0)
                    Thread.sleep(1000)
                }
            }
        }
    }
}
핸들러
위 사진 촬영 버튼 이벤트의 Thread 실행 코드는 1초 간격으로 핸들러에게 메세지를 보내고, 핸들러는 타이머가 실행 되면 1초 마다 실행됩니다. 1초 마다 TextView(ID : txtTimerCount)에 타이머 시간을 보여주고, timerCount 변수의 값을 1씩 감소합니다. timerCount가 -1 이 되면 사진을 찍는 함수를 호출하고, 타이머 숫자를 보여주는 TextView를 숨깁니다.
// Timer Handler
private val handler = object : Handler(Looper.getMainLooper()) {
    override fun handleMessage(msg: Message) {
        binding.txtTimerCount.visibility = View.VISIBLE
        binding.txtTimerCount.text = timerCount.toString()
        timerCount--
        if(timerCount == -1) {
            takePhoto()
            binding.txtTimerCount.visibility = View.INVISIBLE
        }
    }
}
예시 전체 코드 및 실행 화면
권한 설정 : AndroidManifest.xml
AndroidManifest.xml 파일에 아래의 카메라 및 저장소 권한 코드를 추가합니다.
<!--Camera Permission-->
<uses-feature android:name="android.hardware.camera.any" />
<uses-permission android:name="android.permission.CAMERA" />
<!--Storage Permission-->
<uses-permission android:name="android.permission.WRITE_EXTERNAL_STORAGE"/>
<uses-permission android:name="android.permission.READ_EXTERNAL_STORAGE"/>
ViewBinding, CameraX 라이브러리 설정 : build.Gradle
build.Gradle(Module)에 아래의 코드를 추가합니다.
- 5~7줄 : ViewBinding 설정 코드 추가
- 14~24줄 : CameraX 라이브러리 설정 코드 추가
android {

    ...

    viewBinding {
        enabled = true
    }
}

dependencies {

    ...

    // CameraX core library using the camera2 implementation
    def camerax_version = "1.0.0-rc03"
    // The following line is optional, as the core library is included indirectly by camera-camera2
    implementation "androidx.camera:camera-core:${camerax_version}"
    implementation "androidx.camera:camera-camera2:${camerax_version}"
    // If you want to additionally use the CameraX Lifecycle library
    implementation "androidx.camera:camera-lifecycle:${camerax_version}"
    // If you want to additionally use the CameraX View class
    implementation "androidx.camera:camera-view:1.0.0-alpha22"
    // If you want to additionally use the CameraX Extensions library
    implementation "androidx.camera:camera-extensions:1.0.0-alpha22"
}
※ ViewBinding 은 레이아웃(xml)의 View Id로 코틀린 코드에서 View에 접근하기 위해 사용됩니다. ViewBInding 설정 방법 및 Activity, Fragment에서 사용방법은 아래의 링크를 참조해주세요.
안드로이드 View Binding 사용하기 - kotlin-android-extensions 지원 중단
안드로이드 View Binding 방법 정리 안드로이드 코드에서 레이아웃 View에 접근하기 위해 사용된 kotlin-android-extensions 의 지원이 중단예정으로, 이를 대체하여 사용 할 수 있는 ViewBinding 사용법에 대해
juahnpop.tistory.com
레이아웃 : activity_main.xml
activity_main.xml 파일에 아래의 코드를 추가합니다. 아래 코드 최하단의 Button과 TextView가 타이머와 관련된 View입니다.
- Button(Id : btnTimerOnOff) : 타이머 기능 토글 스위치
- Text(Id : txtTimerCount) : 타이머 시간 표시, Invisible(Default)로 설정
<?xml version="1.0" encoding="utf-8"?>
<androidx.constraintlayout.widget.ConstraintLayout xmlns:android="http://schemas.android.com/apk/res/android"
    xmlns:app="http://schemas.android.com/apk/res-auto"
    xmlns:tools="http://schemas.android.com/tools"
    android:layout_width="match_parent"
    android:layout_height="match_parent"
    tools:context=".MainActivity">

    <Button
        android:id="@+id/btnTakePicture"
        android:layout_width="100dp"
        android:layout_height="100dp"
        android:layout_marginBottom="50dp"
        android:scaleType="fitCenter"
        android:text="Take Photo"
        app:layout_constraintLeft_toLeftOf="parent"
        app:layout_constraintRight_toRightOf="parent"
        app:layout_constraintBottom_toBottomOf="@id/viewFinder"
        android:elevation="2dp" />

    <androidx.camera.view.PreviewView
        android:id="@+id/viewFinder"
        android:layout_width="0dp"
        android:layout_height="0dp"
        android:layout_marginBottom="8dp"
        app:layout_constraintBottom_toTopOf="@+id/btnTorch"
        app:layout_constraintEnd_toEndOf="parent"
        app:layout_constraintStart_toStartOf="parent"
        app:layout_constraintTop_toTopOf="parent" >
    </androidx.camera.view.PreviewView>

    <Button
        android:id="@+id/btnTorch"
        android:layout_width="wrap_content"
        android:layout_height="wrap_content"
        android:text="Torch On"
        android:layout_margin="5dp"
        app:layout_constraintBottom_toBottomOf="parent"
        app:layout_constraintStart_toStartOf="parent" />

    <Button
        android:id="@+id/btn1X"
        android:layout_width="60dp"
        android:layout_height="wrap_content"
        android:layout_margin="5dp"
        android:text="1x"
        app:layout_constraintBottom_toBottomOf="parent"
        app:layout_constraintEnd_toStartOf="@+id/btn2X" />

    <Button
        android:id="@+id/btn2X"
        android:layout_width="60dp"
        android:layout_height="wrap_content"
        android:layout_margin="5dp"
        android:text="2x"
        app:layout_constraintBottom_toBottomOf="parent"
        app:layout_constraintEnd_toStartOf="@+id/btn5X" />

    <Button
        android:id="@+id/btn5X"
        android:layout_width="60dp"
        android:layout_height="wrap_content"
        android:layout_margin="5dp"
        android:text="5x"
        app:layout_constraintBottom_toBottomOf="parent"
        app:layout_constraintEnd_toStartOf="@+id/btn10X" />

    <Button
        android:id="@+id/btn10X"
        android:layout_width="60dp"
        android:layout_height="wrap_content"
        android:layout_margin="5dp"
        android:text="10x"
        app:layout_constraintBottom_toBottomOf="parent"
        app:layout_constraintEnd_toEndOf="parent" />

    <TextView
        android:id="@+id/txtZoomState"
        android:layout_width="wrap_content"
        android:layout_height="wrap_content"
        android:text="Hello"
        android:textSize="20sp"
        app:layout_constraintTop_toTopOf="parent"
        app:layout_constraintBottom_toBottomOf="parent"
        app:layout_constraintStart_toStartOf="parent"
        app:layout_constraintEnd_toEndOf="parent"/>

    <TextView
        android:id="@+id/textView3"
        android:layout_width="wrap_content"
        android:layout_height="wrap_content"
        android:layout_margin="20dp"
        android:text="CameraInfo"
        android:textSize="20sp"
        app:layout_constraintEnd_toEndOf="parent"
        app:layout_constraintTop_toTopOf="parent" />

    <TextView

        android:id="@+id/textView4"
        android:layout_width="wrap_content"
        android:layout_height="wrap_content"
        android:text="MaxZoomRatio : "
        android:textSize="20sp"
        app:layout_constraintEnd_toStartOf="@+id/txtMaxZoom"
        app:layout_constraintTop_toTopOf="@+id/txtMaxZoom" />

    <TextView
        android:id="@+id/txtMaxZoom"
        android:layout_width="wrap_content"
        android:layout_height="wrap_content"
        android:textSize="20sp"
        app:layout_constraintEnd_toEndOf="@+id/textView3"
        app:layout_constraintTop_toBottomOf="@+id/textView3" />

    <TextView

        android:id="@+id/textView"
        android:layout_width="wrap_content"
        android:layout_height="wrap_content"
        android:text="MinZoomRatio : "
        android:textSize="20sp"
        app:layout_constraintEnd_toStartOf="@+id/txtMinZoom"
        app:layout_constraintTop_toTopOf="@+id/txtMinZoom" />

    <TextView
        android:id="@+id/txtMinZoom"
        android:layout_width="wrap_content"
        android:layout_height="wrap_content"
        android:textSize="20sp"
        app:layout_constraintEnd_toEndOf="@+id/txtMaxZoom"
        app:layout_constraintTop_toBottomOf="@+id/txtMaxZoom"/>

    <Button
        android:id="@+id/btnTimerOnOFF"
        android:layout_width="wrap_content"
        android:layout_height="wrap_content"
        android:text="timer Off"
        android:layout_margin="10dp"
        app:layout_constraintTop_toTopOf="parent"
        app:layout_constraintStart_toStartOf="parent" />

    <TextView
        android:id="@+id/txtTimerCount"
        android:layout_width="100dp"
        android:layout_height="100dp"
        android:gravity="center"
        android:text="0"
        android:textSize="60sp"
        android:visibility="invisible"
        app:layout_constraintTop_toBottomOf="@id/btnTimerOnOFF"
        app:layout_constraintStart_toStartOf="@id/btnTimerOnOFF"
        app:layout_constraintEnd_toEndOf="@id/btnTimerOnOFF" />

</androidx.constraintlayout.widget.ConstraintLayout>
코틀린 코드 : MainActivity.kt
MainActivity 코드는 아래와 같이 작성하였습니다. Timer 관련된 코드는 아래를 참고하세요.
- 40~41줄 : 전역 변수 선언
- 44~54줄 : Handler
- 107~118줄 : 타이머 On/Off 버튼 이벤트 (
onCreate()내부) - 95~105줄 : 사진 찍기 버튼 이벤트 (
onCreate()내부)
package com.blacklog.camerax

import android.content.Intent
import android.net.Uri
import androidx.appcompat.app.AppCompatActivity
import android.os.Bundle
import android.os.Handler
import android.os.Looper
import android.os.Message
import android.util.Log
import android.view.View
import android.widget.Toast
import androidx.camera.core.*
import androidx.camera.lifecycle.ProcessCameraProvider
import androidx.core.content.ContextCompat
import com.blacklog.camerax.databinding.ActivityMainBinding
import java.io.File
import java.text.SimpleDateFormat
import java.util.*
import java.util.concurrent.ExecutorService
import java.util.concurrent.Executors
import kotlin.concurrent.thread
import androidx.camera.core.Camera as Camera

class MainActivity : AppCompatActivity() {

    // ViewBinding
    lateinit private var binding : ActivityMainBinding
    private var preview : Preview? = null
    private var imageCapture: ImageCapture? = null
    private lateinit var outputDirectory: File
    private lateinit var cameraExecutor: ExecutorService

    // CameraController
    private var camera : Camera? = null
    private var cameraController : CameraControl? = null
    private var cameraInfo: CameraInfo? = null

    // Timer
    private var timerFlag = 0
    private var timerCount = 0

    // Timer Handler
    private val handler = object : Handler(Looper.getMainLooper()) {
        override fun handleMessage(msg: Message) {
            binding.txtTimerCount.visibility = View.VISIBLE
            binding.txtTimerCount.text = timerCount.toString()
            timerCount--
            if(timerCount == -1) {
                takePhoto()
                binding.txtTimerCount.visibility = View.INVISIBLE
            }
        }
    }

    override fun onCreate(savedInstanceState: Bundle?) {
        super.onCreate(savedInstanceState)
        binding = ActivityMainBinding.inflate(layoutInflater)
        val view = binding.root
        setContentView(view)
        startCamera()

        outputDirectory = getOutputDirectory()
        cameraExecutor = Executors.newSingleThreadExecutor()

        binding.btnTorch.setOnClickListener {
            when(cameraInfo?.torchState?.value){
                TorchState.ON -> {
                    cameraController?.enableTorch(false)
                    binding.btnTorch.text = "Torch ON"
                }
                TorchState.OFF -> {
                    cameraController?.enableTorch(true)
                    binding.btnTorch.text = "Torch OFF"
                }
            }
        }

        binding.btn1X.setOnClickListener {
            cameraController?.setZoomRatio(1F)
        }
        binding.btn2X.setOnClickListener {
            cameraController?.setZoomRatio(2F)
        }
        binding.btn5X.setOnClickListener {
            cameraController?.setZoomRatio(5F)
        }
        binding.btn10X.setOnClickListener {
            cameraController?.setZoomRatio(8F)
        }

        binding.btnTakePicture.setOnClickListener {
            when(timerFlag){
                0 -> takePhoto()
                1 -> {
                    timerCount = 3
                    thread(start = true){
                        while(timerCount >= 0){
                            handler.sendEmptyMessage(0)
                            Thread.sleep(1000)
                        }
                    }
                }
            }
        }

        binding.btnTimerOnOFF.setOnClickListener {
            when(timerFlag){
                0 -> {
                    binding.btnTimerOnOFF.text = "Timer ON"
                    timerFlag = 1
                }
                1 -> {
                    binding.btnTimerOnOFF.text = "Timer OFF"
                    timerFlag = 0
                }
            }
        }
    }

    private fun takePhoto() {
        // Get a stable reference of the modifiable image capture use case
        val imageCapture = imageCapture ?: return
        // Create time-stamped output file to hold the image
        val photoFile = File(
                outputDirectory,
                newJpgFileName())
        // Create output options object which contains file + metadata
        val outputOptions = ImageCapture.OutputFileOptions.Builder(photoFile).build()
        // Set up image capture listener, which is triggered after photo has
        // been taken
        imageCapture.takePicture(
                outputOptions,
                ContextCompat.getMainExecutor(this),
                object : ImageCapture.OnImageSavedCallback {
                    override fun onError(exc: ImageCaptureException) {
                        Log.d("CameraX-Debug", "Photo capture failed: ${exc.message}", exc)
                    }
                    override fun onImageSaved(output: ImageCapture.OutputFileResults) {
                        val savedUri = Uri.fromFile(photoFile)
                        val msg = "Photo capture succeeded: $savedUri"
                        Toast.makeText(baseContext, msg, Toast.LENGTH_SHORT).show()
                        Log.d("CameraX-Debug", msg)

                        Intent(Intent.ACTION_MEDIA_SCANNER_SCAN_FILE).also{
                            it.data = savedUri
                            sendBroadcast(it)
                        }
                    }
                })
    }
    // viewFinder 설정 : Preview
    private fun startCamera() {
        val cameraProviderFuture = ProcessCameraProvider.getInstance(this)
        cameraProviderFuture.addListener({
            // Used to bind the lifecycle of cameras to the lifecycle owner
            val cameraProvider: ProcessCameraProvider = cameraProviderFuture.get()
            // Preview
            preview = Preview.Builder()
                    .build()
                    .also {
                        it.setSurfaceProvider(binding.viewFinder.surfaceProvider)
                    }
            // ImageCapture
            imageCapture = ImageCapture.Builder()
                    .build()
            // Select back camera as a default
            val cameraSelector = CameraSelector.DEFAULT_BACK_CAMERA
            try {
                // Unbind use cases before rebinding
                cameraProvider.unbindAll()
                // Bind use cases to camera
                camera = cameraProvider.bindToLifecycle(
                        this,
                        cameraSelector,
                        preview,
                        imageCapture)

                cameraController = camera!!.cameraControl
                cameraInfo = camera!!.cameraInfo

                cameraInfo!!.zoomState.observe(this, androidx.lifecycle.Observer {
                    val currentZoomRatio = it.zoomRatio
                    Log.d("MyCameraXBasic", currentZoomRatio.toString())
                    binding.txtZoomState.text = currentZoomRatio.toString()
                    binding.txtMaxZoom.text = it.maxZoomRatio.toString()
                    binding.txtMinZoom.text = it.minZoomRatio.toString()
                })

            } catch(exc: Exception) {
                Log.d("CameraX-Debug", "Use case binding failed", exc)
            }
        }, ContextCompat.getMainExecutor(this))
    }

    private fun newJpgFileName() : String {
        val sdf = SimpleDateFormat("yyyyMMdd_HHmmss", Locale.KOREA)
        val filename = sdf.format(System.currentTimeMillis())
        return "${filename}.jpg"
    }

    private fun getOutputDirectory(): File {
        val mediaDir = externalMediaDirs.firstOrNull()?.let {
            File(it, resources.getString(R.string.app_name)).apply {
                if(!this.exists()){
                    mkdirs()
                }
            }
        }
        return if (mediaDir != null && mediaDir.exists()) mediaDir
        else filesDir
    }

    override fun onDestroy() {
        super.onDestroy()
        cameraExecutor.shutdown()
    }
}
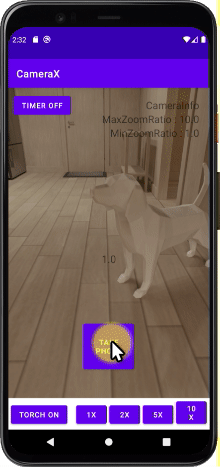
실행 결과
위 코드를 실행하면 아래 그림과 같이, Timer Off 상태에서는 사진이 바로 찍히고, Timer On 상태에서는 3초 카운트 이후에 사진 촬영을 하게 됩니다.
끝까지 읽어 주셔서 감사합니다.^^
'Programming > Android App(Kotlin)' 카테고리의 다른 글
| 안드로이드 코틀린 : CameraX 카메라 앱 - 수동 초점 Focus 기능 추가하기 (5) | 2021.05.25 |
|---|---|
| 안드로이드 코틀린 : CameraX 카메라 앱 - Zoom In/Out 배율 확대 축소 조정하기 (0) | 2021.05.22 |
| 안드로이드 코틀린 : 쉬운 말로 설명하는 Thread 와 Handler 개념 이해 및 타바타 타이머 예시 (5) | 2021.05.21 |
| 안드로이드 코틀린 : CameraX, CameraControl - Flash(Torch) On/OFF (3) | 2021.05.18 |
| 안드로이드 코틀린 : Android Studio 에서 코틀린 언어 연습 하는 방법 (0) | 2021.05.05 |