Android Kotlin : CameraX - Tap to Focus
CameraX 라이브러리와 PreviewView를 사용한 카메라 앱에서 수동 초점 기능을 추가하는 방법
을 소개합니다. 아래 전체 코드에 나와있는 기본 사진 찍기, 줌, 플래쉬, 타이머 설정방법은 이전 포스트를 참고해주세요. 상단의 CameraX 태그 또는 하단의 관련 포스트를 참고하시면 됩니다.
수동 초점 Focus 기능 추가하기
터치 한 곳에 수동 초점을 추가하는 방법은 여러가지가 있겠지만, 카메라 미리보기로 사용하는 PreviewView에 터치 이벤트가 할 때 초점을 맞추도록 리스너를 추가할 수 있습니다.
예시 코드 및 설정
아래 코드는 ViewBinding을 사용하여 작성한 코드 입니다. binding.previewView.setOnTouchListener 에서 previewView는 레이아웃에서 사용한 previewView의 Id를 입력해야 합니다.
아래 람다식의 event는 MotionEvent는 터치를 하거나, 스크롤을 하는 등의 이벤트를 저장하는 클래스 객체입니다. when문을 사용하여 터치한 순간(MotionEvent.ACTION_DOWN) 또는 손을 때는 순간(MotionEvent.ACTION_UP)의 상황에 따라 코드를 작성 할 수 있습니다.
MeteringPoint는 포커스를 목적으로 사용될 좌표를 저장하는 클래스라고 생각하면됩니다. MateringPointFactory는 MateringPoint를 생성 할 수 있는 클래스 입니다. MateringPointFactory의 createPoint() 메서드는 MateringPoint를 반환합니다. 생성된 MateringPoint로 FocusMeteringAction을 생성합니다.
FocusMeteringAction.Builder(MeteringPoint point): AF, AE, AWB 모드FocusMeteringAction.Builder(MateringPoint point, int meteringMode)- meteringMode는 아래의 상수 조합으로 구성 될 수 있음
- FocusMeteringAction.FLAG_AF
- FocusMeteringAction.FLAG_AE
- FocusMeteringAction.FLAG_AWB
- meteringMode는 아래의 상수 조합으로 구성 될 수 있음
생성된 FocusMeteringAction 을 사용하여 cameraController의 에 초점을 설정합니다.
// Obtain Camera, CameraControl Instance
val camera = cameraProvider.bindToLifecycle(this, cameraSelector, preview, imageCapture)
val cameraController = camera.cameraControl

...

// Tap to Focus
binding.previewView.setOnTouchListener { v, event ->
    when (event.action) {
        MotionEvent.ACTION_DOWN -> {
            v.performClick()
            return@setOnTouchListener true
        }
        MotionEvent.ACTION_UP -> {

            // Get the MeteringPointFactory from PreviewView
            val factory = binding.viewFinder.meteringPointFactory

            // Create a MeteringPoint from the tap coordinates
            val point = factory.createPoint(event.x, event.y)

            // Create a MeteringAction from the MeteringPoint, you can configure it to specify the metering mode
            val action = FocusMeteringAction.Builder(point).build()

            // Trigger the focus and metering. The method returns a ListenableFuture since the operation
            // is asynchronous. You can use it get notified when the focus is successful or if it fails.
            cameraController?.startFocusAndMetering(action)

            v.performClick()
            return@setOnTouchListener true
        }
        else -> return@setOnTouchListener false
    }
}
※ 위 코드는 아래 링크를 참조하여 수정하였습니다.
Android CameraX : 카메라 제어 및 쿼리.
소개 올해의 Google I / O에서 발표 및 알파 출시 이후 개발자가 고품질 앱을보다 쉽게 구축 할 수 있도록 지원하는 Jetpack 라이브러리 제품군의 일부인 CameraX에 대한 많은 기대가있었습니다. 이
ichi.pro
CameraX 카메라 앱에 적용하기 : 전체코드
이 코드가 실행되기 위해 권한 설정, CameraX 사용 설정, ViewBInding 설정이 되어야 합니다. 이 방법은 이전 포스트인 아래 링크를 참조해주세요.
안드로이드 코틀린 : CameraX 로 사진 촬영하기
안드로이드 코틀린 : CameraX 라이브러리로 사진 찍기 CameraX 는 카메라 앱 개발을 쉽게 할 수 있도록 만들어진 Jetpack 지원 라이브러리 입니다. CameraX 라이브러리를 사용하여 Snow 어플과 같은 카메라
juahnpop.tistory.com
레이아웃 activity_main.xml
activity_main.xml 의 코드는 아래와 같이 작성하였습니다.
<?xml version="1.0" encoding="utf-8"?>
<androidx.constraintlayout.widget.ConstraintLayout xmlns:android="http://schemas.android.com/apk/res/android"
    xmlns:app="http://schemas.android.com/apk/res-auto"
    xmlns:tools="http://schemas.android.com/tools"
    android:layout_width="match_parent"
    android:layout_height="match_parent"
    tools:context=".MainActivity">

    <Button
        android:id="@+id/btnTakePicture"
        android:layout_width="100dp"
        android:layout_height="100dp"
        android:layout_marginBottom="50dp"
        android:scaleType="fitCenter"
        android:text="Take Photo"
        app:layout_constraintLeft_toLeftOf="parent"
        app:layout_constraintRight_toRightOf="parent"
        app:layout_constraintBottom_toBottomOf="@id/viewFinder"
        android:elevation="2dp" />

    <androidx.camera.view.PreviewView
        android:id="@+id/viewFinder"
        android:layout_width="0dp"
        android:layout_height="0dp"
        android:layout_marginBottom="8dp"
        app:layout_constraintBottom_toTopOf="@+id/btnTorch"
        app:layout_constraintEnd_toEndOf="parent"
        app:layout_constraintStart_toStartOf="parent"
        app:layout_constraintTop_toTopOf="parent" >
    </androidx.camera.view.PreviewView>

    <Button
        android:id="@+id/btnTorch"
        android:layout_width="wrap_content"
        android:layout_height="wrap_content"
        android:text="Torch On"
        android:layout_margin="5dp"
        app:layout_constraintBottom_toBottomOf="parent"
        app:layout_constraintStart_toStartOf="parent" />

    <Button
        android:id="@+id/btn1X"
        android:layout_width="60dp"
        android:layout_height="wrap_content"
        android:layout_margin="5dp"
        android:text="1x"
        app:layout_constraintBottom_toBottomOf="parent"
        app:layout_constraintEnd_toStartOf="@+id/btn2X" />

    <Button
        android:id="@+id/btn2X"
        android:layout_width="60dp"
        android:layout_height="wrap_content"
        android:layout_margin="5dp"
        android:text="2x"
        app:layout_constraintBottom_toBottomOf="parent"
        app:layout_constraintEnd_toStartOf="@+id/btn5X" />

    <Button
        android:id="@+id/btn5X"
        android:layout_width="60dp"
        android:layout_height="wrap_content"
        android:layout_margin="5dp"
        android:text="5x"
        app:layout_constraintBottom_toBottomOf="parent"
        app:layout_constraintEnd_toStartOf="@+id/btn10X" />

    <Button
        android:id="@+id/btn10X"
        android:layout_width="60dp"
        android:layout_height="wrap_content"
        android:layout_margin="5dp"
        android:text="10x"
        app:layout_constraintBottom_toBottomOf="parent"
        app:layout_constraintEnd_toEndOf="parent" />

    <TextView
        android:id="@+id/txtZoomState"
        android:layout_width="wrap_content"
        android:layout_height="wrap_content"
        android:text="Hello"
        android:textSize="20sp"
        app:layout_constraintTop_toTopOf="parent"
        app:layout_constraintBottom_toBottomOf="parent"
        app:layout_constraintStart_toStartOf="parent"
        app:layout_constraintEnd_toEndOf="parent"/>

    <TextView
        android:id="@+id/textView3"
        android:layout_width="wrap_content"
        android:layout_height="wrap_content"
        android:layout_margin="20dp"
        android:text="CameraInfo"
        android:textSize="20sp"
        app:layout_constraintEnd_toEndOf="parent"
        app:layout_constraintTop_toTopOf="parent" />

    <TextView

        android:id="@+id/textView4"
        android:layout_width="wrap_content"
        android:layout_height="wrap_content"
        android:text="MaxZoomRatio : "
        android:textSize="20sp"
        app:layout_constraintEnd_toStartOf="@+id/txtMaxZoom"
        app:layout_constraintTop_toTopOf="@+id/txtMaxZoom" />

    <TextView
        android:id="@+id/txtMaxZoom"
        android:layout_width="wrap_content"
        android:layout_height="wrap_content"
        android:textSize="20sp"
        app:layout_constraintEnd_toEndOf="@+id/textView3"
        app:layout_constraintTop_toBottomOf="@+id/textView3" />

    <TextView

        android:id="@+id/textView"
        android:layout_width="wrap_content"
        android:layout_height="wrap_content"
        android:text="MinZoomRatio : "
        android:textSize="20sp"
        app:layout_constraintEnd_toStartOf="@+id/txtMinZoom"
        app:layout_constraintTop_toTopOf="@+id/txtMinZoom" />

    <TextView
        android:id="@+id/txtMinZoom"
        android:layout_width="wrap_content"
        android:layout_height="wrap_content"
        android:textSize="20sp"
        app:layout_constraintEnd_toEndOf="@+id/txtMaxZoom"
        app:layout_constraintTop_toBottomOf="@+id/txtMaxZoom"/>

    <Button
        android:id="@+id/btnTimerOnOFF"
        android:layout_width="wrap_content"
        android:layout_height="wrap_content"
        android:text="timer Off"
        android:layout_margin="10dp"
        app:layout_constraintTop_toTopOf="parent"
        app:layout_constraintStart_toStartOf="parent" />

    <TextView
        android:id="@+id/txtTimerCount"
        android:layout_width="100dp"
        android:layout_height="100dp"
        android:gravity="center"
        android:text="0"
        android:textSize="60sp"
        android:visibility="invisible"
        app:layout_constraintTop_toBottomOf="@id/btnTimerOnOFF"
        app:layout_constraintStart_toStartOf="@id/btnTimerOnOFF"
        app:layout_constraintEnd_toEndOf="@id/btnTimerOnOFF" />

</androidx.constraintlayout.widget.ConstraintLayout>
코틀린 코드 : MainActivity.kt
코틀린 코드는 아래와 같습니다. 지난 CameraX 관련 포스트의 코드에서 123~150줄 onCreate() 함수안에 Tap to Focus 코드를 추가하였습니다. Fragment를 사용하는 경우 상황에 따라 onCreateView() 또는 onViewCreated() 에 코드를 작성하면 됩니다.
package com.blacklog.camerax

import android.content.Intent
import android.net.Uri
import androidx.appcompat.app.AppCompatActivity
import android.os.Bundle
import android.os.Handler
import android.os.Looper
import android.os.Message
import android.util.Log
import android.view.MotionEvent
import android.view.View
import android.widget.Toast
import androidx.camera.core.*
import androidx.camera.lifecycle.ProcessCameraProvider
import androidx.core.content.ContextCompat
import com.blacklog.camerax.databinding.ActivityMainBinding
import java.io.File
import java.text.SimpleDateFormat
import java.util.*
import java.util.concurrent.ExecutorService
import java.util.concurrent.Executors
import kotlin.concurrent.thread
import androidx.camera.core.Camera as Camera

class MainActivity : AppCompatActivity() {

    // ViewBinding
    lateinit private var binding : ActivityMainBinding
    private var preview : Preview? = null
    private var imageCapture: ImageCapture? = null
    private lateinit var outputDirectory: File
    private lateinit var cameraExecutor: ExecutorService

    // CameraController
    private var camera : Camera? = null
    private var cameraController : CameraControl? = null
    private var cameraInfo: CameraInfo? = null

    // Timer
    private var timerFlag = 0
    private var timerCount = 0

    // Timer Handler
    private val handler = object : Handler(Looper.getMainLooper()) {
        override fun handleMessage(msg: Message) {
            binding.txtTimerCount.visibility = View.VISIBLE
            binding.txtTimerCount.text = timerCount.toString()
            timerCount--
            if(timerCount == -1) {
                takePhoto()
                binding.txtTimerCount.visibility = View.INVISIBLE
            }
        }
    }

    override fun onCreate(savedInstanceState: Bundle?) {
        super.onCreate(savedInstanceState)
        binding = ActivityMainBinding.inflate(layoutInflater)
        val view = binding.root
        setContentView(view)
        startCamera()

        outputDirectory = getOutputDirectory()
        cameraExecutor = Executors.newSingleThreadExecutor()


        binding.btnTorch.setOnClickListener {
            when(cameraInfo?.torchState?.value){
                TorchState.ON -> {
                    cameraController?.enableTorch(false)
                    binding.btnTorch.text = "Torch ON"
                }
                TorchState.OFF -> {
                    cameraController?.enableTorch(true)
                    binding.btnTorch.text = "Torch OFF"
                }
            }
        }

        binding.btn1X.setOnClickListener {
            cameraController?.setZoomRatio(1F)
        }
        binding.btn2X.setOnClickListener {
            cameraController?.setZoomRatio(2F)
        }
        binding.btn5X.setOnClickListener {
            cameraController?.setZoomRatio(5F)
        }
        binding.btn10X.setOnClickListener {
            cameraController?.setZoomRatio(8F)
        }

        binding.btnTakePicture.setOnClickListener {
            when(timerFlag){
                0 -> takePhoto()
                1 -> {
                    timerCount = 3
                    thread(start = true){
                        while(timerCount >= 0){
                            handler.sendEmptyMessage(0)
                            Thread.sleep(1000)
                        }
                    }
                }
            }
        }

        binding.btnTimerOnOFF.setOnClickListener {
            when(timerFlag){
                0 -> {
                    binding.btnTimerOnOFF.text = "Timer ON"
                    timerFlag = 1
                }
                1 -> {
                    binding.btnTimerOnOFF.text = "Timer OFF"
                    timerFlag = 0
                }
            }
        }

        binding.viewFinder.setOnTouchListener { v : View, event : MotionEvent ->
            when (event.action) {
                MotionEvent.ACTION_DOWN -> {
                    v.performClick()
                    return@setOnTouchListener true
                }
                MotionEvent.ACTION_UP -> {

                    // Get the MeteringPointFactory from PreviewView
                    val factory = binding.viewFinder.meteringPointFactory

                    // Create a MeteringPoint from the tap coordinates
                    val point = factory.createPoint(event.x, event.y)

                    // Create a MeteringAction from the MeteringPoint, you can configure it to specify the metering mode
                    val action = FocusMeteringAction.Builder(point).build()

                    // Trigger the focus and metering. The method returns a ListenableFuture since the operation
                    // is asynchronous. You can use it get notified when the focus is successful or if it fails.
                    cameraController?.startFocusAndMetering(action)

                    v.performClick()
                    return@setOnTouchListener true
                }
                else -> return@setOnTouchListener false
            }
        }
    }

    private fun takePhoto() {
        // Get a stable reference of the modifiable image capture use case
        val imageCapture = imageCapture ?: return
        // Create time-stamped output file to hold the image
        val photoFile = File(
                outputDirectory,
                newJpgFileName())
        // Create output options object which contains file + metadata
        val outputOptions = ImageCapture.OutputFileOptions.Builder(photoFile).build()
        // Set up image capture listener, which is triggered after photo has
        // been taken
        imageCapture.takePicture(
                outputOptions,
                ContextCompat.getMainExecutor(this),
                object : ImageCapture.OnImageSavedCallback {
                    override fun onError(exc: ImageCaptureException) {
                        Log.d("CameraX-Debug", "Photo capture failed: ${exc.message}", exc)
                    }
                    override fun onImageSaved(output: ImageCapture.OutputFileResults) {
                        val savedUri = Uri.fromFile(photoFile)
                        val msg = "Photo capture succeeded: $savedUri"
                        Toast.makeText(baseContext, msg, Toast.LENGTH_SHORT).show()
                        Log.d("CameraX-Debug", msg)

                        Intent(Intent.ACTION_MEDIA_SCANNER_SCAN_FILE).also{
                            it.data = savedUri
                            sendBroadcast(it)
                        }
                    }
                })
    }
    // viewFinder 설정 : Preview
    private fun startCamera() {
        val cameraProviderFuture = ProcessCameraProvider.getInstance(this)
        cameraProviderFuture.addListener({
            // Used to bind the lifecycle of cameras to the lifecycle owner
            val cameraProvider: ProcessCameraProvider = cameraProviderFuture.get()
            // Preview
            preview = Preview.Builder()
                    .build()
                    .also {
                        it.setSurfaceProvider(binding.viewFinder.surfaceProvider)
                    }
            // ImageCapture
            imageCapture = ImageCapture.Builder()
                    .build()
            // Select back camera as a default
            val cameraSelector = CameraSelector.DEFAULT_BACK_CAMERA
            try {
                // Unbind use cases before rebinding
                cameraProvider.unbindAll()
                // Bind use cases to camera
                camera = cameraProvider.bindToLifecycle(
                        this,
                        cameraSelector,
                        preview,
                        imageCapture)

                cameraController = camera!!.cameraControl
                cameraInfo = camera!!.cameraInfo

                cameraInfo!!.zoomState.observe(this, androidx.lifecycle.Observer {
                    val currentZoomRatio = it.zoomRatio
                    Log.d("MyCameraXBasic", currentZoomRatio.toString())
                    binding.txtZoomState.text = currentZoomRatio.toString()
                    binding.txtMaxZoom.text = it.maxZoomRatio.toString()
                    binding.txtMinZoom.text = it.minZoomRatio.toString()
                })

            } catch(exc: Exception) {
                Log.d("CameraX-Debug", "Use case binding failed", exc)
            }
        }, ContextCompat.getMainExecutor(this))
    }

    private fun newJpgFileName() : String {
        val sdf = SimpleDateFormat("yyyyMMdd_HHmmss", Locale.KOREA)
        val filename = sdf.format(System.currentTimeMillis())
        return "${filename}.jpg"
    }

    private fun getOutputDirectory(): File {
        val mediaDir = externalMediaDirs.firstOrNull()?.let {
            File(it, resources.getString(R.string.app_name)).apply {
                if(!this.exists()){
                    mkdirs()
                }
            }
        }
        return if (mediaDir != null && mediaDir.exists()) mediaDir
        else filesDir
    }

    override fun onDestroy() {
        super.onDestroy()
        cameraExecutor.shutdown()
    }
}
실행 결과
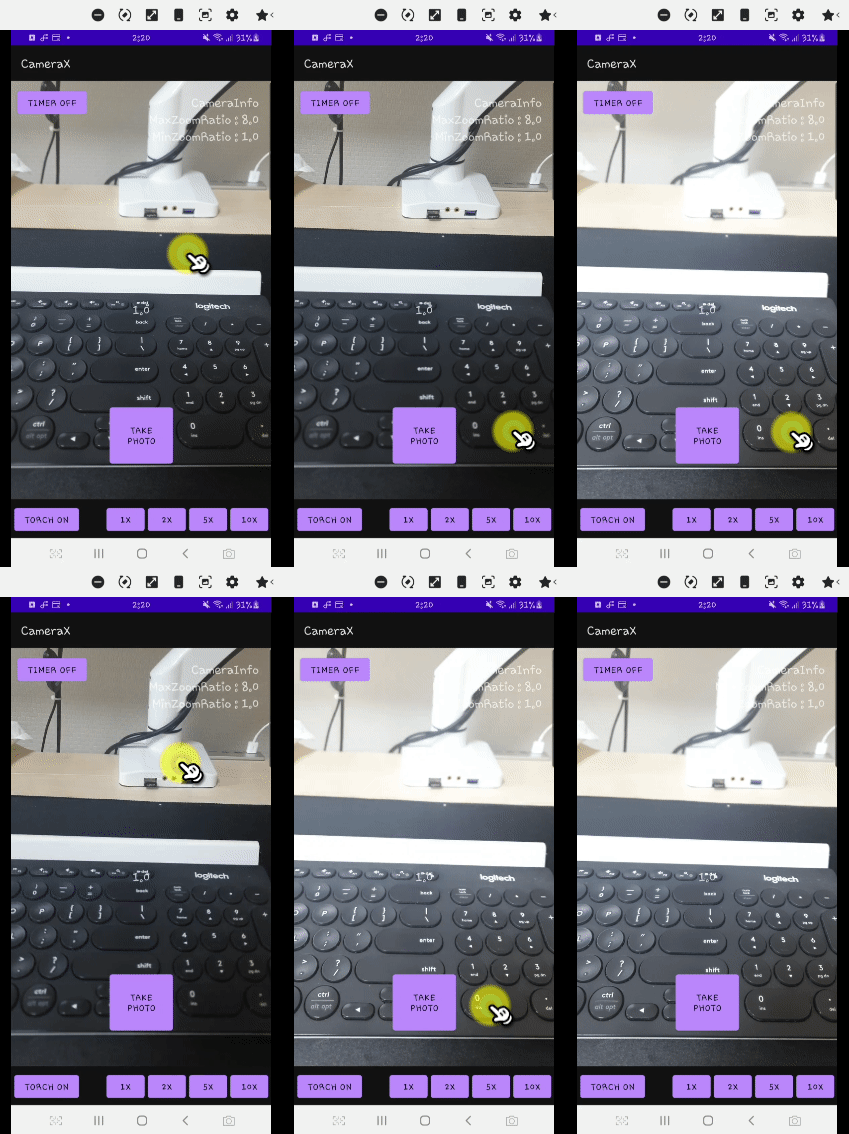
위 코드를 실행하면 아래와 같이 터치한 곳을 중심으로 포커싱이 되는 것을 확인 할 수 있습니다.

끝까지 읽어 주셔서 감사합니다.^^
'Programming > Android App(Kotlin)' 카테고리의 다른 글
| 안드로이드 코틀린 : CameraX 카메라 앱 - 타이머 모드 추가하기 (3) | 2021.05.23 |
|---|---|
| 안드로이드 코틀린 : CameraX 카메라 앱 - Zoom In/Out 배율 확대 축소 조정하기 (0) | 2021.05.22 |
| 안드로이드 코틀린 : 쉬운 말로 설명하는 Thread 와 Handler 개념 이해 및 타바타 타이머 예시 (5) | 2021.05.21 |
| 안드로이드 코틀린 : CameraX, CameraControl - Flash(Torch) On/OFF (3) | 2021.05.18 |
| 안드로이드 코틀린 : Android Studio 에서 코틀린 언어 연습 하는 방법 (0) | 2021.05.05 |
